|
Table of Contents
L3DT to Blender Tutorial
This tutorial is now obsolete. To export to Blender in L3DT v2.9 build 26 or later, use the 'File→Export→Export optimised mesh' menu option (see user guide). With this option you can export the terrain mesh and texture as a COLLADA '.dae' file, which can be then imported into Blender with no further work.
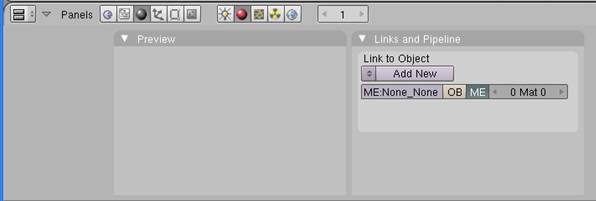
Part One: In L3DTStep 1.1: Download L3DT from http://www.bundysoft.com/L3DT/downloads/ If this is your first time using L3DT, I recommend the tutorial that runs on your first time. Create a world in Blender. Step 1.2: In L3DT, select the menu “File” → “Export” → “Export Map…” Select “Heightfield”. In the “File Format:” popup, change the selection to “OBJ (Wavefront)”. Click “Browse…” and select a file name. Optional: Click “Re-size for export” and choose smaller dimensions – start with something small I start with “128”. This can help cut down on memory and file size. If you don't cut this down your file could be very large Blender might run very slowly. Click “OK”. Step 1.3: If you have paid for the L3DT Pro, you may be able to select “File” → “Export” → “Texture Map”. But I don’t have the registered version so I can’t test this. In the standard version, I do the following hack instead. From the menus, select “View” → “Show Map” and in this popup select “Texture map”. Close the popup. Maximize your window (to make the screen as large as possible). From the menus, select “File” → “Export” → “Screen capture”. Click “Save”. You’re not done yet! It will take 5-10 seconds to do the screen capture. Don't switch to another application or do anything until it completes, or your file could be partially blank/white. Part Two: In An Image Editing Program (like Adobe Photoshop)Step 2.1: Open the image you just created in an image editing program, such as Adobe Photoshop. Step 2.2: Flip the image vertically. (This is necessary if you haven’t configured L3DT to flip exported objects automatically – it exports files upside down from how Blender needs them). To do this in Photoshop, open the file and then from the menus select “Select” → “All”. Then from the menus select “Edit” → “Transform” → “Flip vertical”. Step 2.3: Scale the image to a square image size that's a power of 2 (i.e. 512×512). To do this in Photoshop, from the menus select “Image” → “Image Size” and type the pixel size in. Part Three: In BlenderStep 3.1: Download and install Blender from http://www.blender.org/download/get-blender/ Run Blender. Step 3.2: From the menus, select “File” → “New”. Watch for the little dialog that pops up under the mouse – click “Erase All”. Then press the “delete” key on the keyboard. Look for the little popup under the mouse and click “Erase selected object(s)”. This will delete the default cube object and create an empty file. Step 3.3: From the menus, select “File” → “Import” → “Wavefront (.obj)”. Browse to the .obj file that you exported earlier. In the upper right corner, click “Import a Wavefront OBJ”. Step 3.4: Press “F5” to bring up the materials panel. The bottom of your Blender window should look like this image. Sometimes you have to press “F5” several times to get to this window. On the right side, under “Links and Pipeline”, click “Add new”.
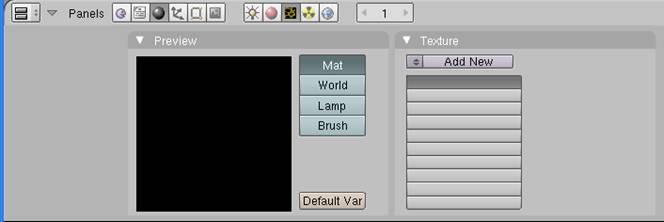
Step 3.5: Press “F6” to bring up the textures panel. The bottom of your Blender window should look like this image:
On the right side, under “Texture”, click “Add New”.
Change the “Texture Type” popup from “None” to “Image”. The image should look like this:
In the far right panel under “Image” click “Load”. Browse to the image that you exported from your image editing program, and click the button in the upper right hand corner to load it. That’s it! You’re done! Old, outdated directionsThe following text is an old version of this page. It may have extra information not provided in the above tutorial. Experts may take advantage of it.
L3DT can now export the heightmap as an OBJ mesh, which can be imported directly by Blender.
– Aaron 2007/11/15 This is how I bring my L3DT terrains to Blender…. I assume you know your way a little in Blender, and that you can export image maps from L3DT. First, create a plan from top view (7 for top view, space>mesh>plane), then enter Uv face select mode (F), and project from view bounds (u), this has to be done in top view. Change 3d view to uv/image editor (shift-f10), load your heightmap texture, get back to 3d view (shift-f5), your heightmap should appear on the plane…
You can split your 3d view in 2 by rightclicking near header bar where the mouse icon changes, and make one half a uv/image edit view, that way you don't have to change all the time.
Then exit Uv face select mode (F) and enter edit mode (tab) and multisubdivide (W>subdivide multi) it (number of subdivides is up to you, the more, the better, but not very good for realtime hehe). Exit edit mode (tab)… Edit: oops forgot before you can access textures in texture panel you have to add a material –> Material panel (F5) > Add new material Now on texture panel (F6) , make a new texture, call it “disp” for example, assign your heightmap to it. Go to Edit panel (F9), and add Displacement modifier, in texture, enter “disp”, and replace “local” by “uv” and voila the plane changes to a nice terrain…
If you plan to change anything later on in texture panel for example to make a render with the colour map, i suggest you apply the modifier first.
Back to tutorial index Except where otherwise noted, content on this wiki is licensed under the following license:CC Attribution-Share Alike 3.0 Unported
|


