Zooming and Panning
Zooming and panning of the map display in L3DT is achieved using the zoom and default mouse modes, respectively, and by using the mouse scroll-wheel. These are hopefully quite intuitive, but if you find otherwise, their usage is explained below.
The zoom mouse mode
You can activate the zoom mouse-mode by clicking on the toolbar button shown below. To zoom in on a feature, simply click-and-drag the mouse over it. Alternatively, a single left-click will step the zoom in by a factor of 2× on the click-point. Right-clicking while in this mode will step out to the previous zoom setting, and right-clicking again will zoom all the way out.
Zooming with the scroll wheel
For those mice / mouses so-equipped you can use the scroll-wheel to step the zoom in / out by a factor of 2× (works in either zoom or pan mode).
Zooming out
Clicking on the base zoom toolbar button, shown below, will force the display to zoom all the way out, scaling the map such that it fills the available window space.
Panning the view
In the default (info) mouse mode, left-clicking and dragging with the mouse will pan the viewport without changing the zoom.
Setting the view area
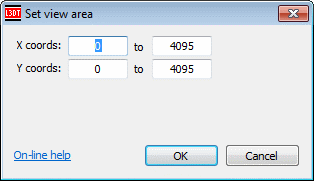
To manually set the view coordinates, select the 'View→Set view area' menu option. This will open the 'Set view area' window, shown below:
In this window, you may set the exact coordinates of the map area to be displayed. Once you click OK, L3DT will redraw the map display to include the specified area. If the coordinates do not exactly match the aspect ratio of the window, L3DT will pad the map display such that the entire specified area will be shown, and centred in the window.
