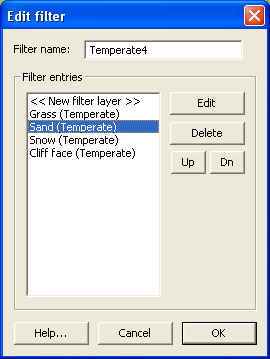
Filter editor
The filter editor window, shown below, allows you to edit attributes map filters, and is opened from the filter manager window.
The controls and options are described below:
Filter name
It's a very good idea to give your filter a name, and it's an even better idea to give your filter a name that's informative. Thus, it is recommended that you give your filter a name that describes the land types produced, and also notes the number of layers produced by the filter. For example, the 'temperate4' filter produces up to four alpha layers (grass, sand, snow, rock), and uses the 'temperate' climate.
Filter names may not be duplicates of other filters, and may not contain the following characters:
- . (period)
- ' (apostrophe)
- ” (quotation mark)
- <
- >
<< New filter layer >>
To create a new filter layer, double click on the '« New filter layer »' option in the layer list. This option opens the filter layer editor window.
Edit
To edit a filter layer, select the layer in the list, then click on the 'edit' button. This option opens the filter layer editor window.
Delete
To delete a filter layer, select the layer in the list, then click on the 'delete' button.
Layer order (up/dn)
The 'Up' and 'Dn' buttons may be used to re-order the layers. When applying the filter, atFilterAM compares the land type name at a given pixel with the layer strings based on their order in the list. The first layer with a string that matches the land type name will be used to generate the alpha map1). Thus:
- Layers with specific search strings should be listed above layers with general search strings (i.e. “steep grass” before “grass”).
- Layers with wildcard strings “*” should be listed last.
