|
Table of Contents
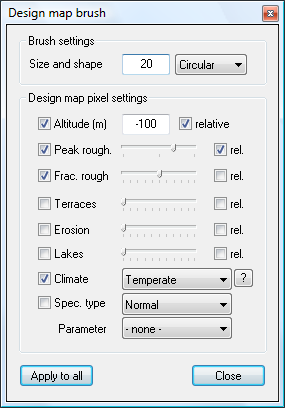
The design map brush toolThe Design map brush window is activated by selecting the 'Tools→Design map brush' option in the menu or by viewing the design map, and then clicking on the 'edit map layer' toolbar icon shown below:
What do all the settings do?For an quick guide to what the parameters do, please consult these pages: What's with all the checkboxes?The checkboxes on the left of the dialog indicate which of the fields will be applied (ie. altitude, peak & fractal roughness, climate), with the others left unchanged. The relative or rel. checkboxes on the right indicate whether the changes will be relative. In the above example, the altitude will be decreased by 100m, the peak roughness will be increased by about 50% and the fractal roughness will be set to ~50% (absolute). The climate will also be set to 'Temperate'. The other values will be unchanged because they are not enabled (check-boxes on left). Using the brush on the design mapLeft-clicking and dragging the mouse around on the map display will apply the setting from this dialog box. Alternatively, the Apply to all button will apply the activated fields to the whole map, or to the currently selected area.
An example of using the design map brush tool to build a map from scratch is provided on the designing a fjord tutorial page.
If you change the mouse mode (eg to zoom, etc), you can re-activate this tool by left-clicking within the dialog box.
Except where otherwise noted, content on this wiki is licensed under the following license:CC Attribution-Share Alike 3.0 Unported
|


